Friday, October 21, 2011

Searching with Google

Most people when they need to find something online turn to their favorite search engines for answers. This often means Google and sometimes Bing or Yahoo. These are massive search engines that give you thousands of results, far too many to go through. What ends up happening is you look at only the first couple of pages hoping that something useful is there. However, if you know a little something about searching you can get those useful results closer to the top of the list.

Think carefully about the subject you are trying to find information on and come up with a sentence that describes what you want.
Click for larger image.

 Pick out the 2-3 fact carrying words from that sentence to use in your search. 
Look at the difference in the first results.

If you get few (good) results try re-thinking your words. One of the words you picked might not be the one most used by people writing on the subject. From your results find out how most people write about your topic and use their words. You might have to do several searches until you get the right combination.

Now, on to what you actually type. You can get better results by using certain symbols to limit or broaden your search. Let’s look at Google.

When Google does a search it looks not only for your word but for plurals and synonyms. If you do a search for the words nurse and school you will get results for nurse, nursing, nurses, school, and schools.
If you want to stop it from looking for all those other words put a + sign in front of the word, like +nurse and you won’t get all the similar terms.

If you do want it to look for similar and related terms you can put a ~ sign in front of the word, like ~school. Doing this will get you results for not just school, schools, and schooling, but also academy, teacher, and institute.

Search engines don’t generally look for what are called “stop words”. These are common words like and, a, the, but, or. If you want to look for them in a phrase, or if you want to look up words in a specific order, put quotations around your phrase. “And that’s all” will give you that exact phrase. If you search for it without the quotation marks you won’t get the “and” and “that’s” and “all” will be out of order.

If you want to find two words near each other separate them with AROUND(5) which will make sure they are within 5 words of each other. It might look like, storm AROUND(5) damage.

You can combine all these things, like ~storm AROUND(5) +damage. Try ~storm ~damage. Try different words and combinations to see what you get.


When you get the results Google gives you further options to the left side to narrow things down. You can search for images, videos, news, blogs, and more. You can narrow your search to a certain time period, say the last year, or create your own custom date range to only look for things in the last five years. There are other things you can do, like look for translated pages or related searches. You can play with them if you want but the most useful might be the Not Yet Visited option so you can exclude websites you’ve already looked at.

You can also use the Advanced Search Screen to better organize your thoughts.


As a search tip remember that, especially with medical related topics, there is always an organization, foundation, council, or association and their websites are great sources of information. Look over the website to make sure they aren’t trying to push a specific viewpoint. Always ask the questions: Who is paying for this? Who benefits? Why do they exist?  MedlinePlus is a great place to find legitimate associations and foundations.

Wednesday, October 19, 2011

Flash Drive Re-cap

This is just a little re-cap about using your flash drive correctly.

Once you’ve put it in the USB slot the computer should detect the new hardware and automatically open a dialog box asking you what you want to do.

Click “Open folder to view files”.


Your flash drive folder will open, showing you all the files stored on it.

When you are done using your flash drive, make sure you eject it properly or you risk negatively affecting it. 

Click the little upward facing arrow at the bottom right of the screen and then click on the picture of a USB connection with a green checkmark next to it.


You’ll get a couple of options. Choose to “Eject removable disk”.


When you get the “Safe to remove hardware” message you can pull your flash drive out. If you get an error message saying the device cannot be stopped, make sure all files that have been saved to the flash drive are closed and then try again. You can’t remove your flash drive if a word document that is saved on it is still open.


Tuesday, October 18, 2011

Brochure page creation exercise

The following are steps for creating a brochure page. This can be modified to create a flyer or handout as well. Normal text steps are the buttons or menus you need to click and instructions in italic are things like writing text, choosing a color, or re-sizing/re-positioning a picture. I'll put my finished product at the end.


Page Layout → Orientation → Landscape → Page Color → Choose Color → Page Borders → Choose Style → Undo (Use arrow at top or press Ctrl + z) → Columns → Three.

Insert → Shapes → Choose a basic shape (I recommend rectangle, rounded rectangle, or oval)Hold left mouse button down and drag to create a shape on the left side of the page Make shape the size you want by pulling on the little circles at the corners. This shape will act as one of the columns on your brochure.Note that you are now on the Format bar at the top of the page → Shape Fill → Choose color → Shape Outline → More outline colors → Choose color (or choose no outline) → Add Text (This button is at the left of the screen)Type something → Highlight Text (Click and Drag. Move arrow over text option box that appears.) → Change text font, size, and color as you want. Center text is you want.

Insert → Clip Art → Enter a keyword in the Search for boxChoose a picture (notice you are back on the Format bar only with different options)Place cursor after text and before picture. Press Enter key until picture is located where you want it.Click picture once to select it for editing.In the Format bar, hover the mouse arrow over different Picture Styles to see the effects. Choose one if you like. → Picture Shape → Choose a shape → Undo → Note Picture Border and Picture Effects. Play with them if you like.

Insert → Text Box → Draw Text Box → Hold left mouse button down and drag until you have the desired size within your shape. → Shape Fill → Choose color → Shape Outline → Choose color or no outline → Type text → Highlight text → Use text option box to change text font, size, and color.

Right click outside shape to stop editing inside shape.

Insert → Shape → Choose shape.Create shape in center portion of page for middle column.Repeat previous Shape steps.

Insert → Picture → Choose picture from folder and insert. Fix placement, choose style or customize as you want. Add text above or below as you want.

Insert → Text Box → Simple Text Box →Position → Position in top right with square text wrapping (This is your right side column)Reposition and resize. (You can right click the box to get the option to remove content control) Type your text. → Shape fill → Shape outline → Highlight text → Change type font, size, color. Repeat until you have as many text boxes as you need. Try to make sure you text lines up down the page.

Insert → Clip art → Search for a colorChoose something that looks like a background → Position → Position in Middle right with square text wrapping → Move into position and resizeCustomize using picture styles, shape, border, and effects. → Send to Back → Send behind text.

Insert → Clip art → Search for an appropriate keyword. Choose something and insert. → Position → Position to Middle right → Move into place. Organize it among text.

Insert → Blank page.

Click for larger image.

Monday, October 17, 2011

Microsoft Word Insert and Picture Format Bars

If you want to be fancy, or need to create a brochure or flyer, you need to get acquainted with the Insert bar. Mixing pictures, clip art, shapes, and text boxes can be a bit of a pain, since if you don't know what you're doing (and even when you do) they tend to behave in ways contrary to your wishes, but it gets easier the more you practice.
Here's a quick review of what you'll most use.

The Insert Bar:

Click for a larger image. Right-click and open in new tab to switch between text and picture.


This allows you to add design elements to your work. You can put in pictures, clip art, charts, shapes that you can use as background or to write in, headers, footers, page numbers, and text boxes.


You can add a simple text box, click the right button on it to get the option to remove content control, and then move it and make it the size you want.


Once you have your design element you can customize it with the format bar. This only appears once you’ve inserted something.


The Format Bar (Picture Tools):

Click for larger image.

You can move a shape (or any design element) around by clicking the “Position” arrow on the right and choosing a placement. Once you’ve done that you’re free to move the picture/shape/text box anywhere you want.

If you want to use a picture or shape as background click on the “Send to back” option. I recommend putting in your text first before the background otherwise your picture might disappear.
You can also do picture effects and change the picture border.

The Shape bar is a little different.

The Format Bar (Drawing Tools):


With this you can change the color and outline of the shape, give it a shadow or 3-D effect, rotate it, or set it as background with “Send to back”. You can add text to it as well.

Next post will be a brochure creation exercise. Follow the instructions to get an idea of how everything works. I'll also post a screen shot of what I came up with while using them.

Wednesday, October 12, 2011

Microsoft Office Word Review

Word is most likely the word processor you will end up using, especially as that's what the school has, so let's review it's features.

The Home Bar.

Click to see larger size.


With this bar you can change the way your text looks.
Either make changes before you type or highlight your text (by holding the left mouse button and pulling down until you reach the end.)
-Where it says “Calibri (Body) is where you can change the font. Click on the little downward facing arrow to look at the menu.
-Where it says “11” is where you can change the size of the text.
-The B will make your text bold. You can also do this by pressing “Ctrl” and “b” at the same time. Press them again to stop writing in bold text.
-The slanted I is for italic text. The shortcut for this is “Ctrl” and “I”.
-The U is for underlining you text. The shortcut is “Ctrl” and “u”.
-The “A” with the red line under it gives you options to change the color of your text.
-The “ab” with the yellow line under it gives you options to change the color of the background behind your text.
-The little lines of text over the word Paragraph let you change where the text aligns.
The one that is highlighted and is standard aligns text to the left. The next puts everything in the middle, and the last to the right.
-If you click the little arrow to the right of the word Paragraph the paragraph menu will pop up. Under the tab Indents and Spacing in the Spacing section is the Line Spacing option. You can set this to Single (this will leave no space between your lines of text) or Double (this leaves a line of space between text). Click Don't add space between paragraphs of the same style if you don't want an extra line of space when you hit the Enter key for a new paragraph.
-The easiest way to delete something is to highlight it (press and hold the left mouse key and move the cursor over the text) and press the Backspace key.


The Page Layout Bar.


This bar changes the page itself rather than anything on it.
You can change the margins of the page if you really want.
You can change the orientation of the page from portrait to landscape. Landscape is good for brochures and signs.
You can add more columns or change the color or the page itself.
You can also add a page border.

Notice up at the top the left facing arrow next to the Save button (the blue disk). That will undo whatever you’ve just done. You can press it as many times as you need to. If you change your mind after undoing something you can press the right facing arrow to put it back in.

Shortcuts:

Ctrl + c is Copy. You can “copy” text or a picture and then “paste” it in the new place.
Ctrl + v is Paste. This adds whatever you’ve copied.
Ctrl + b is Bold.
Ctrl + I is Italics.
Ctrl + u is Underline.
Ctrl + z is Undo.
Ctrl + y is Redo.
Ctrl + n is New document.
Ctrl + s is Save.
Ctrl + p is Print.

Tuesday, August 16, 2011

MeSH (Medical Subject Headings)

MeSh, or Medical Subject Headings, is the controlled vocabulary created by the National Library of Medicine for indexing purposes. Many medical institutions and schools use these specialized terms in order to organize and allow easier access to their holdings. Searching by these headings or their subheadings allows you to find articles and books on topics you are interested in that you wouldn't find with a keyword search. As I said in the post on searching PubMed (http://ghntslibrary.blogspot.com/2011/07/searching-pubmed.html) your search phrase may not be in the title, abstract, or text. You can't know exactly what words or phrases the individual authors are going to use. Catalogers solve this problem by assigning a phrase from the controlled vocabulary to all these similar articles.

Try doing a "Title/Abstract" and a "MeSH Terms" search on "Medication Errors" and compare the results. "Title/Abstract" gives you 2257 results while the "MeSH Terms" search gives you 8691. That means that the Title/Abstract search is missing 6434 relevant articles because the exact phrase you were looking for isn't mentioned. While you don't want to look through over 8000 results, this at least gives you some leeway in narrowing things down by using further search terms and limiters.

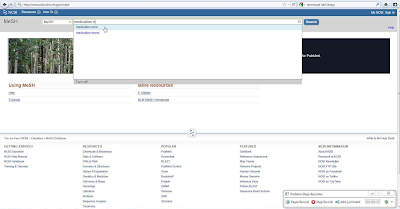
Her's the homepage of PubMed. Click on the MeSH Database link at the lower right. Here you can search for the exact terms to use.

Click to enlarge.
You can search for a MeSH the same way you search for anything else. It will even give you options as you type.


Next you will be taken to that Subject Headings page. This breaks down what category your term is in and what subheadings it has. Subheadings are further classifications within the main category. Using these terms in the MeSH Subheadings field on the advanced search page allows you to create even more specific searches.

You can see where Medication Errors falls in the Health Care Category.
You can also search from the MeSH database. Notice the search box to the right of the page. You can search for everything labeled Medication Errors by checking the box "Restrict to MeSH Major Topic". If you don't want to search the categories further down the line, which in this case includes "Medication Reconciliation", check the box "Do not include MeSH terms found below this term in the MeSH hierarchy". You can check both of these together to restrict your search to Medication Errors.
You can also search the subheadings by checking the ones you like. If you check any of these you cannot also check the Restrict box.

Once you've checked the boxes that interest you, click the Add to Search Builder button and it will appear in the search box.


You can add more than one term and you can even use the Boolean AND, OR, or NOT by adding a term you don't want to look for with the NOT button chosen. Then you can hit Search PubMed and you will be taken to the search results page. Remember to click the free full text button at the right to see what articles are immediately available.

Wednesday, August 10, 2011

Utilizing local library resources

When looking for information remember to use whatever is available to you. This includes your local library and state resources. States and counties subscribe to various databases that are free to use by residents. Let's take a look at a few.

http://www.sailor.lib.md.us/
This is Maryland's resource website. Clicking on the Research Database button takes you to the services the state offers to all who have a library card for one of the county library systems. MasterFILE Premier is a journal and reference database with a large selection of articles just remember to search for full text.

http://www.finditva.com/
This is Virginia's resource website. Again, if you have a library card for a Virginia library you can use these databases. Their PowerSearch looks through a large number of resources all at once. Again, remember to limit your search to full text. If you click on the Public Libraries link on the home page you can choose from a number of subjects, including health. There you have access to the Nursing and Allied Health collection and the Health Reference Center.

http://www.dclibrary.org/research/databases
Here is DC's database page. They also have a health section where you can find the Health and Wellness resource center and their virtual reference collection.

Each county in has their own online reference collection as well so it's important to remember to go to your library's website to see what's there. Another thing to remember: You can get a library card for most of these counties if you live in the area. DC gives cards to anyone who lives in the surrounding counties. Northern Virginia and Maryland counties do the same. So all databases are available as long as you apply for a card in that system.

Prince George's County has a Health Source: Nursing/Academic Edition database. Fairfax and Alexandria counties have a Health and Wellness Resource center. Look around and see what you can use.

Wednesday, July 27, 2011

Searching PubMed

PubMed (http://www.ncbi.nlm.nih.gov/pubmed) should be your go-to for medical articles. It's the search engine for the National Library of Medicine, with articles on medicine, nursing, dentistry, veterinary medicine, the health care system, and preclinical sciences from Medline, life science journals, and online books. It has thousands of free full-text articles and all of them are from trustworthy sources.

 The main page has many useful resources but let's focus on just the search feature for now. At the top is the basic search bar. Using that is likely to get you an overwhelming number of results though. Try the advanced search instead. As usual, it gives you many options to narrow things down.

Click to enlarge. Note all the resources at the bottom of the page.

The advanced search page has one big field at the top where your search will be built piece by piece. What you do is use the smaller box below it to add search terms and limiters. Choose a field from the drop-down menu to the left, like Title/Abstract, put your term in and then click "Add to Search Box." Continue to add terms until you're satisfied that you've specified what you want.

Choose a field, enter your terms, click Add to Search Box. The field you just wrote in will clear and your term will be added to the big box at the top.
I would suggest also using the "Publication Date" field to limit your results to articles from the last 5 years or so. Choose "Language" so you can filter out articles you can't read.

You can see the search terms I've added in the big box at the top.


You can look for things by subject as well. A word (or several) on that. PubMed uses Medical Subject Headings, or MeSH terms. (Library of Congress Subject Headings, LCSH, are most used outside medical libraries. Sometimes these two systems are used together.) These are a controlled vocabulary that lets similar documents be grouped together so they can be found easier. That way if you are looking for an article on "medication errors" and the article you want doesn't have that phrase but instead uses "medication administration errors" you'll still find it. To find out what subject headings there are you can search the MeSH database but I'll talk about that later. Choose "MeSH Terms" to search for a subject.

When you have entered everything in and your search is ready you can click preview and the number of articles that match your search will be displayed. If there are too many you can change your search to narrow things down. If there are too few try taking out one of your search terms or changing your language. This is when it is useful to search by MeSH terms rather than looking for a specific phrase in the article's text. When you are happy with what you've got, click search.

This search when done will give me 44 results.
Your results are now listed but you need articles you can read without paying a ridiculous 30 bucks to buy. Click on the "Free Full Text" link to the right.

With what companies charge to read scholarly articles you'd think academia was only for the rich or something.
Choose an article that catches your fancy. Read the abstract to see if it looks good and then click the "Link Out" button to see where it's available.


I would recommend choosing the PubMed links if you have the option. You can also look and see which MeSH terms the article has been assigned to by clicking on the link located above the Link Out button. You can click on any of the terms to see what else is filed under it.

This is also a good way to find out what terms you can search by.

Remember to write down what steps you've taken when conducting a search so you can duplicate it later if necessary and so you know what you've already tried. If you can't recall what you've already done you might end up going in circles and getting increasingly frustrated. Also, when you've found an article you like, write down the full citation information so you can find it again.

Wednesday, July 20, 2011

Abstracts

A brief word about abstracts. Articles often have a summary of their contents on the same page where the rest of the metadata is shown. This is called an abstract and it is an important tool for deciding whether an article is worth reading.

Abstracts are written by someone other than the article's author. There are companies that provide this service so the finished product tends to be objective and concise. 99% of the time the abstract is going to be the first piece of information you see. Since it contains the important points from the article, reading it will tell you if this is something you can use.

There are different types of abstracts that summarize in different ways and to a different depth. Most articles just have a brief synopsis of the contents but if the article is reporting the findings of a trial or study then you will get the background, aims, methods, results, and conclusions that they found. Let's take a look at a couple abstracts.

This is an abstract of a study article on PubMed.
This is a brief abstract on PubMed.
Look at the difference between these two. The first gives the essential information about the study that was done, including the methods used. The second gives an outline of what the article is talking about.

Rather than searching the entire text of an article for a word or phrase you can often choose to search only the abstract or title/abstract for your keywords.  Let's say you're looking for an article about the importance of influenza vaccinations. You search for the phrase "influenza vaccinations" and get 50 articles. You look through them and find out that 25 of these articles are about something else entirely and only mention your phrase in passing. The articles that are about influenza vaccinations probably have that phrase in their abstract since it's an important part of the content. That's why you want to look for it there rather than in the text.
So you re-do your search to find the phrase in the abstract and you get 25 results. You can read the abstracts before you look through the entire article to decide which one best fits what you need.

That's not to say you should never do a keyword search in the text. An article may not be about your topic but it might have an important chunk of information about what you need. Also you can combine searching for a keyword in the text with searching for a phrase in the abstract to get even better results. Not all articles have abstracts either.

Reading abstracts is also a good way to learn how to summarize. That's basically what an abstract is anyway; a summary of the article's contents. Read the abstract, read the article, and then read the abstract again to get an idea about how the person who wrote the abstract summarized the article's contents.

Friday, July 15, 2011

Using Google Documents

I love using Google Docs. I can open, edit, and save my work from anywhere. This is especially useful if you're working from a public terminal at school and you've forgotten to bring your flash drive.

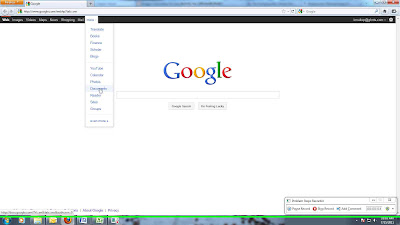
You need a Google account, of course. You can easily sign up for one, all you need is an email address. Next go to Google Documents.
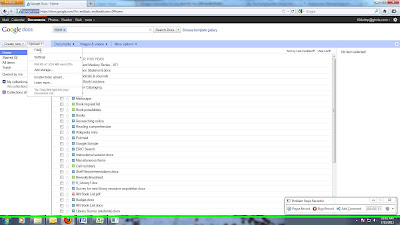
Click to see larger image.
You can upload from there.

You can also upload PowerPoint presentations, images, and videos and then share them with other people.
Once you've clicked upload files you can choose the document you want to save. You have a couple of options. You can save the document as is or you can convert it to the Google Documents format. If you want to work on it while online you have to save it in Google's format but if you just want to save it and download it somewhere else later you can un-check that option.


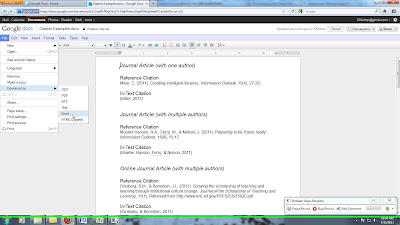
You can also save it in Google Docs format, work on it online, and then download it as a Word doc later.

You can download it as Word, PDF, or HTML.
Once something is uploaded to Google Docs you can pull up the list of your files anytime. Just click on the name to open it. If you have converted it to Google Docs format you can edit it right there. You can also create new documents and save them in Google Docs and then download them to your computer later. Just click the "Create New" button next to Upload. Then pick what you want to make. You can create a document, a presentation, spreadsheet, etc. You can rename it at the top, type what you need, and it will automatically save it to your Google Docs page. Look at the above picture. Next to Google Docs at the top left of the page is the title of the document I uploaded. If I wanted to rename it I would click on that title and enter something new in the box that pops up. At the top right is the save button. It saves automatically when you make changes but remember to check it before you close the document.

Click Google Docs to go back to your list of files. To delete something, check the box next to it in the list, click "Actions", and then click "Move to Trash". You can also share files. Check the document, click "Actions" and click "Share". You will be given the options of emailing it to someone or adding them as a viewer on Google Docs. This means they can view it on Google Docs.

Play around with it a bit and get used to how it works. This is the best way for learning a new tool. Once you've used the features a few times and gotten a hands on feeling for what it can do you'll feel more comfortable using it.

Wednesday, July 13, 2011

Searching ebrary

There are a lot of very useful resources in ebrary's Academic Complete collection. They have nearly 70,000 full-text items in 20 subject areas, 288 listed under the subject of nursing. They also have dictionaries, math and science books, history, law, and so on. With so many books it is absolutely necessary to master their search engine. Let's take a look at how it works.

Simple search box with the advanced option top right.


If you use the simple search box on the main page it will search the text of the books. This can get you too many results. Try looking up the word "Pheromones" and you get 829 documents. To find out where the word pops up in each document, go to the Chapter Results tab at the top.
Click to see larger image.
You'll be taken to a page where each book is listed along the chapter that your word appeared most. These results are ranked by how often there was a hit on your search term in the book.

You can click on the chapter you want to look at.
Click on an item and you'll be taken to that chapter in the book. All instances of your word will be highlighted. The little bar next to each chapter shows how many times your term appeared there. Click on the magnifying glass to be taken to the first hit in each chapter.

This is only partially helpful. There 76 references but you can only go to the first one. You have to page through the chapter for the rest.
Let's go to the advanced search for more control over our results.

You start off with one search field box. It's automatically set to "Text and Key Fields". This means it will search every word in both the text and the metadata, like title, subject, etc. Change that first box to something useful, like Subject, and enter your search term. Add another box by clicking the plus (+) sign next to the first.


Choose a second metadata field, like Publication Date. I've chosen Subject: Nursing and Publication Date: 2005-2099, because for some reason it's set to search decades into the future. That would be a lot more impressive if it actually found something. Hit the search button and you'll find far fewer results than with a simple search. Well, not with my search. I would suggest also adding a Text and Key Fields box to look up a particular word or topic you're interested in. Also, there are further subjects suggested over your search results. You can click on one of the radial buttons and hit search and it will narrow your search down by that field.


Creating a new search is a little harder as ebrary doesn't seem to have a  button to let you clear your last search. To start over you have to clear out your old search yourself. Press the little minus (-) buttons next to the search fields to take the extra ones away and then erase whatever you have typed in the remaining one.

You can also browse the books by subject. The "All Subjects" link is next to "Advanced Search". This will take you to a page with links for 20 subjects.  Once you've clicked on a subject you can see all the books listed under it. You will also be given further choices under that subject to narrow your focus. Again, your search won't clear automatically and if you click on "All Subjects" again you will be taken to whatever subject you were last looking at rather than the page listing all of them. Above the subject headings but below the "Title Results" tab are listed the categories you are currently looking at. To get to the main list of subjects again, click "Top".

Monday, July 11, 2011

APA format


Main points to remember about APA format.


1. There are three parts: Cover page, Paper, and Bibliography.

2. The cover page includes the title of the paper, your name, and the name of your college. This should be centered in the middle of the page.

3. Your paper should be double-spaced, in Times New Roman, 12 pt. font.

4. You should have a running header that includes the title of the paper and the page number.

5. Your bibliography should be labeled "References" and the citations should be in alphabetical order.

6. When you quote a source or include an idea from a source in the written body of your paper you should use an In-Text Citation. The full citation then goes in the bibliography.


Citation Examples (for bibliography).


Journal Article (with one author)

Reference Citation
Miller, C. (2011). Creating intelligent libraries. Information Outlook, 15(4), 27-29.

In-Text Citation
(Miller, 2011)


Journal Article (with multiple authors)

Reference Citation
Mueller-Hanson, R.A., Ferro, M., & Nelson, J. (2011). Preparing to be 'future ready'. Information Outlook, 15(4), 15-17.

In-Text Citation
(Mueller-Hanson, Ferro, & Nelson, 2011)


Online Journal Article (with multiple authors)

Reference Citation
Ginsberg, S.M., & Bernstein, J.L. (2011). Growing the scholarship of teaching and learning through institutional culture change. Journal of the Scholarship of Teaching and Learning, 11(1), Retrieved from http://www.eric.ed.gov/PDFS/EJ915920.pdf

In-Text Citation
(Ginsberg, & Bernstein, 2011)


Book

Reference Citation
Simenon, G. (2006). Red lights. New York, NY: New York Review Books.

In-Text Citation
(Simenon, 2006)


Web Page Article

Reference Citation
Linthurst, H.A. (2006). Designing better media through social networking. Retrieved from http://www.PRR.com/socialnetworking

In-Text Citation
(Linthurst, 2006)


Web Page Article (with no author)

Reference Citation
New child vaccine gets funding boost. (2001). Retrieved March 21, 2001, from http://news.ninemsn.com.au/health/story_13178.asp

In-Text Citation
("New child vaccine," 2001)


Web Page Article (with no author or date)

Reference Citation
Heuristic. (n.d.). In Merriam-Webster’s online dictionary (11th ed.). Retrieved from     http://www.m-w.com/dictionary/heuristic

In-Text Citation
("Heuristic," n.d., para. 1)


Web Site

Reference Citation
www.cdc.gov

In-Text Citation
(www.cdc.gov)


A further note on the bibliography and several helpful links.


The reference list or bibliography in APA format should be a separate double-spaced page listing the citations alphabetically by the author’s last name. The first line should have no indents. The other lines should be indented.

How do you format a bibliography in APA Style? (n.d.) Retrieved from http://www.apastyle.org/learn/faqs/format-bibliography.aspx


This is the APA website.

This is a citation maker. This is good for helping check citations but you should do them yourself initially to make sure they’re correct.

American Psychological Association. (2001). Publication manual of the American Psychological Association. Washington, DC: American Psychological Association.

Look here for help with your title page.

Wednesday, July 6, 2011

New books

The library has acquired four new books.
First up, The Portable LPN: The all-in-one reference for practical nurses, 2nd edition. This is "a one-stop source of relevant facts and clear-cut guidelines." As this is a reference book, it cannot be checked out but you are welcome to use it in the library.


The next is Chart Smart: The A-to-Z guide to better nursing documentation, 3rd edition. This book will show you "how to chart safely and responsibly in all clinical settings."  It has "hundreds of practical examples" to help you "learn how to document routine nursing care as well as essential details."


Next we have two books from Lippincott's Incredibly Easy series. I.V. Therapy and Medical-Surgical Made Incredibly Easy! Good for any sticky points you've been having difficulties with.